How to Prompt Scrimba Explain: Teaching Styles, Audience, Attachments

Last updated:
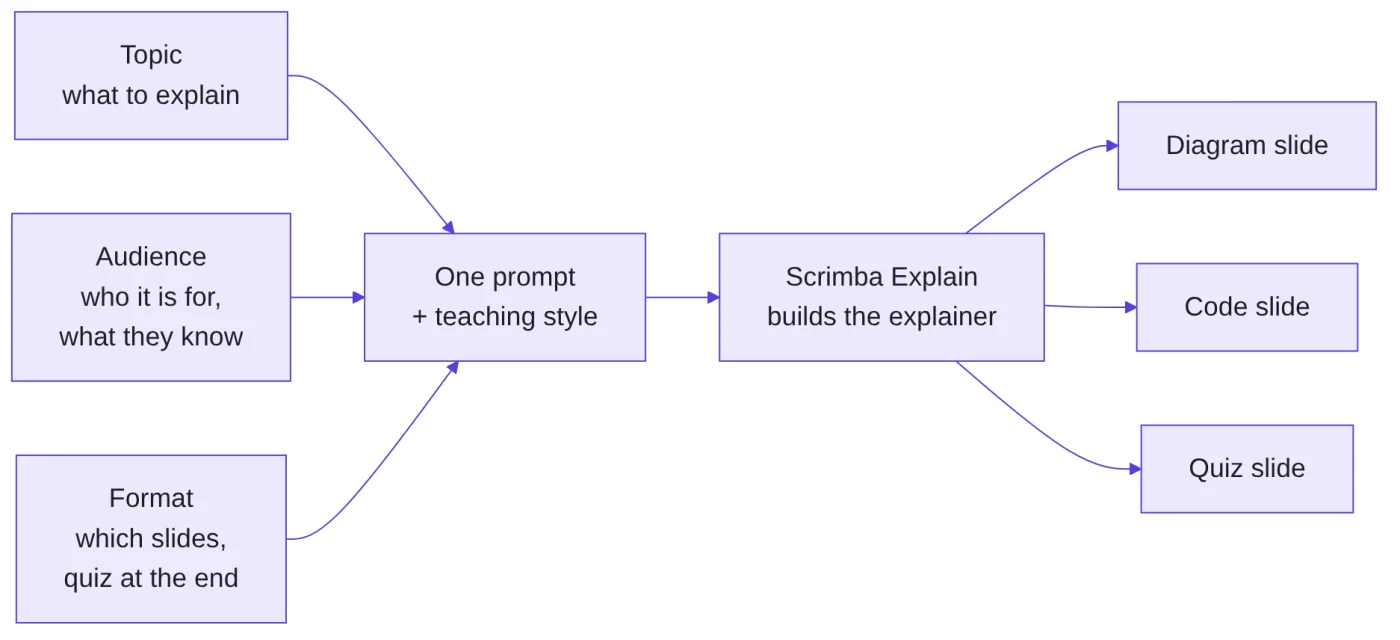
A good Scrimba Explain prompt names the topic, the audience, and the slides you want. I ran the same RAG prompt through three teaching styles, attached a Markdown file, and built a three-lesson playlist, seven explainers in total. Professor was not noticeably deeper than Standard, which suggests the prompt text, not the picker, sets the depth.
If you do not know what Explain is yet, the reference page covers entry points and quotas, and the full review covers whether the output is any good. This post is only about the web composer at scrimba.com/explain (opens in a new tab): what to type, which style to pick, and which clicks cost you an explainer.
The three ingredients of a prompt
Scrimba's prompting guide says a prompt needs a topic, an audience, and the slide types you want (docs.scrimba.com/explain/prompting (opens in a new tab)). Explain decides the structure and layout itself. You can also name an art style for all the images, such as hand-drawn or blueprint, and you can push the depth past whatever the teaching style implies.
The docs call the audience line "the sentence most people leave out". I did not test a prompt without one, so I cannot show you what "Explain RAG" alone produces. Every explainer I ran with an audience line stayed on that audience. "For a JavaScript developer who has called an LLM API once" got JavaScript instead of Python and a pipeline that ends in a prompt string. The style comparison below suggests the picker moves the output less than the prompt text does.
The same RAG prompt in three teaching styles
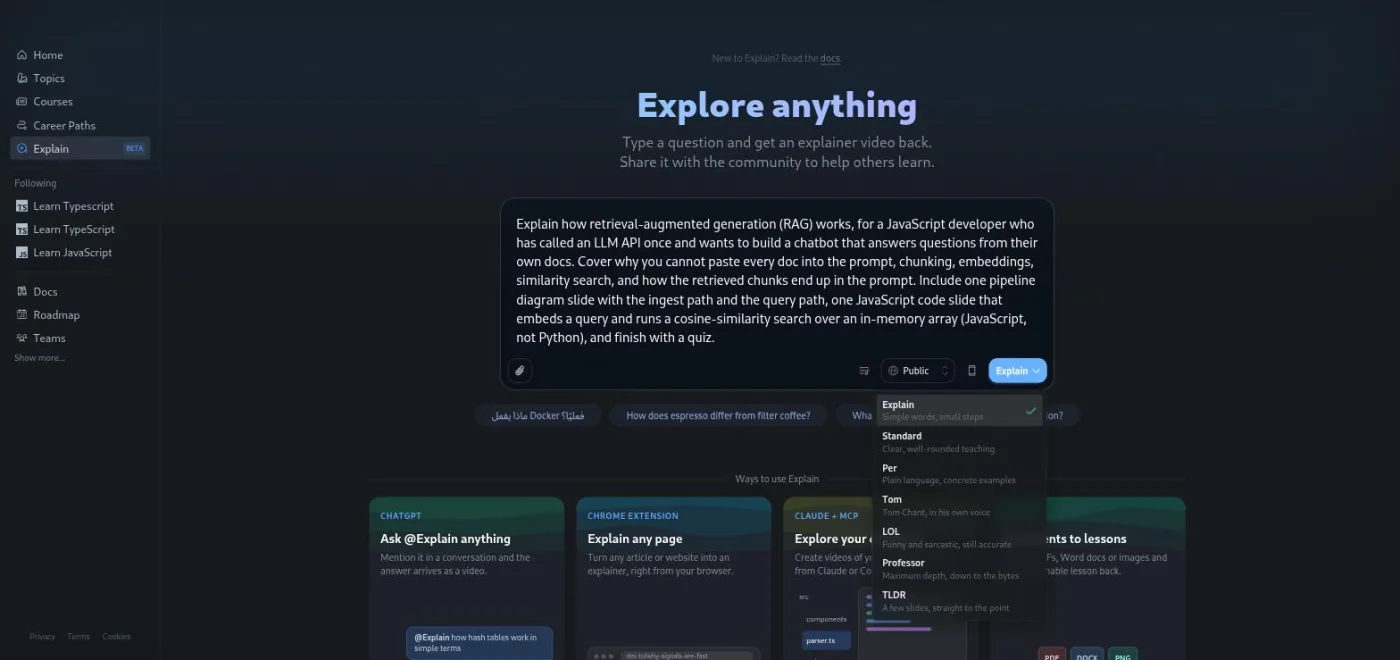
Teaching styles are a web-only picker that changes both the writing and the voice (docs.scrimba.com/explain/teaching-styles (opens in a new tab)). To see how much they change, I submitted this prompt three times, word for word, and only moved the picker.
Explain how retrieval-augmented generation (RAG) works, for a JavaScript developer who has called an LLM API once and wants to build a chatbot that answers questions from their own docs. Cover why you cannot paste every doc into the prompt, chunking, embeddings, similarity search, and how the retrieved chunks end up in the prompt. Include one pipeline diagram slide with the ingest path and the query path, one JavaScript code slide that embeds a query and runs a cosine-similarity search over an in-memory array (JavaScript, not Python), and finish with a quiz.
RAG (retrieval-augmented generation) is the pattern where you search your own documents for relevant chunks and paste only those into the prompt. Scrimba teaches it in the Learn RAG course, which is why I picked it: I could check the output against a curriculum I had already read.
| Style | Explainer | Length | Transcript headings |
|---|---|---|---|
| Explain (default) | Retrieval-Augmented Generation (RAG) | 1:20 | The context window problem, Chunking your data, The RAG Pipeline, Finding the right chunks, The final prompt, Test your knowledge |
| Standard | How RAG Works | 1:28 | The context window problem, The RAG pipeline, Chunking and Embeddings, Similarity search, Finding similar chunks, The final prompt, Test your knowledge |
| Professor | How RAG Works | 1:26 | The context window limit, The RAG pipeline, What is an embedding?, Similarity search in JS, The augmented prompt, Your turn |
All three delivered the requested slides: an animation, a pipeline diagram, a search.js code slide, a second code slide that builds the prompt, and a quiz. All three stayed in JavaScript. The differences were smaller than the taglines suggest.
The Explain version leaned on an analogy (an exam desk with too many books) and used shorter sentences. It also had the one slip of the batch: the code comment calls a plain dot product "cosine similarity", which is only true when the vectors are normalised. The concept explanation around it was fine, but if you copied that snippet you would ship a subtle bug.
The Standard version fixed that. Its cosineSimilarity(vecA, vecB) divides by both magnitudes, and its ingest and query paths were the clearest of the three. It is embedded below, so you can watch the one I would keep without leaving the page.
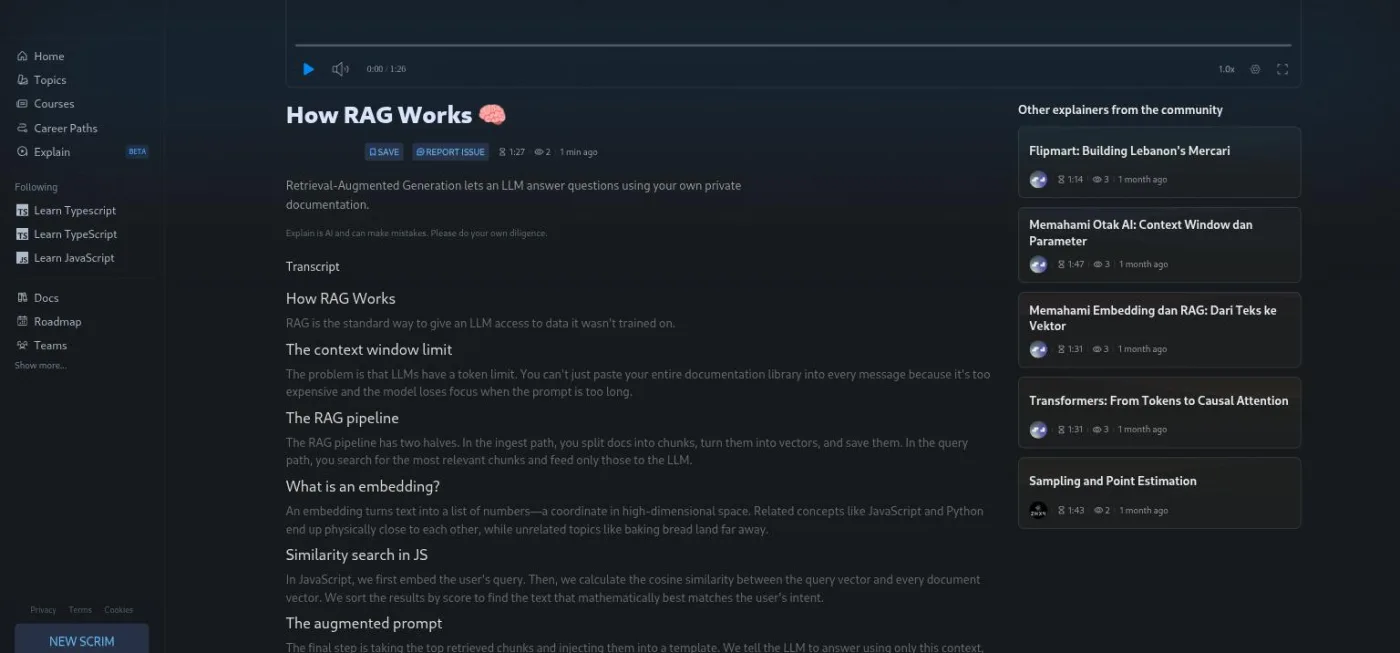
Professor promises "Maximum depth, down to the bytes". At this prompt length it did not deliver that. It added a docs array with example vectors and a nice intuition (JavaScript and Python embed close together, baking bread lands far away), but no wire formats, no memory layout, nothing Standard lacked. My reading: the prompt already pinned the depth, and the style could not push past it. The docs say depth comes mainly from the teacher you pick and that the prompt can amplify it. In my run the prompt did most of the work, so I would put the detail in the prompt and treat the style as a bonus.
Attaching a document
The composer accepts code files, Markdown, READMEs, logs, PDFs, images and Jupyter notebooks. Drag a file onto the box, use the paperclip, or paste a large block of text and Explain converts it into an attachment (docs.scrimba.com/explain/attaching-documents (opens in a new tab)). The docs state no size or file count limit, and they say nothing about how uploads are stored.
I attached a 98-line Markdown file I had written about the MCP lifecycle and transports. MCP (Model Context Protocol) is the standard that lets an AI agent call tools on a server, and it has its own Scrimba course. The prompt:
Explain this document for a Node.js developer who wants to build their first MCP server. Focus on what a server offers (tools, resources, prompts), the stdio transport, and the initialize handshake. Include one sequence-diagram slide of the three-message handshake between client and server, one short TypeScript slide showing a minimal tool registered with the MCP SDK, and finish with a quiz.
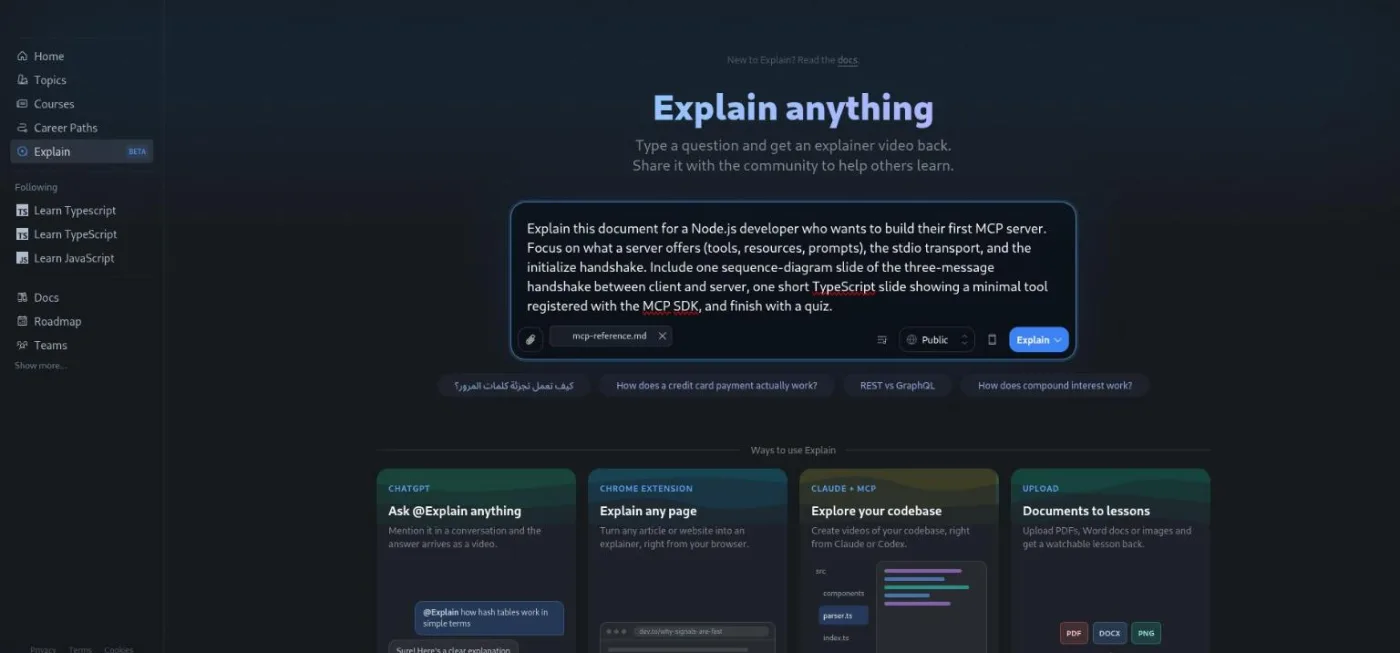
The result, Building Your First MCP Server (1:17), tracked the file closely. The sequence diagram labelled the three messages initialize, result and notifications/initialized, as my document did. The server.ts slide used the real @modelcontextprotocol/sdk and zod imports, and the narration repeated my note that a stdio server must log to console.error, never console.log. It skipped the section on Streamable HTTP, which the prompt had not asked about.
So an attachment does two things. It grounds the explainer in your text instead of the model's general knowledge, and it lets you point the prompt at parts of the document. Attach your own notes before an exam, or a README you have to onboard onto, and ask for the three things you keep forgetting.
Playlists as a mini curriculum
Toggle the playlist icon next to the visibility picker and Explain plans a series of explainers on one topic, then builds them lesson by lesson (docs.scrimba.com/explain/playlists (opens in a new tab)). Each lesson gets its own URL, and the playlist inherits whatever style and visibility you chose. I asked for three lessons on context engineering, the subject of Scrimba's Learn Context Engineering course.
Context engineering for AI agents, for a developer who has built one chatbot and is now adding tools and memory. Three lessons, each under 2 minutes. Lesson 1: what actually goes into the context window on every call (system prompt, message history, tool schemas, tool results) and why it fills up faster than you expect; include one diagram slide. Lesson 2: retrieval versus long context, when to fetch a few relevant chunks and when to send everything. Lesson 3: managing memory and tool results, summarising old history, truncating large tool output, and keeping state outside the window. Use short JavaScript examples where code helps, and end lesson 3 with a quiz.
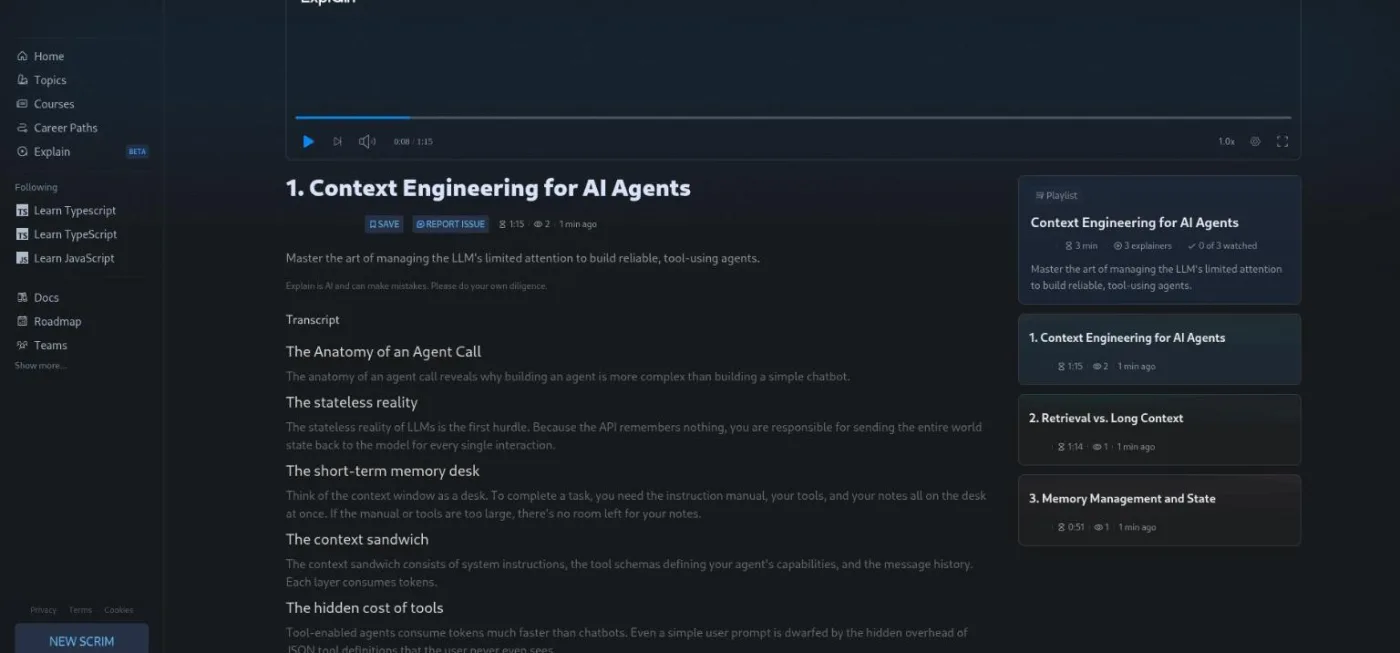
The three lessons came out at 1:15, 1:14 and 0:51 (lesson 1, lesson 2, lesson 3), and the whole set finished building in under 40 seconds. Each lesson stayed on its assigned sub-topic and referred back to the previous one. Lesson 1's payload.json slide shows the system prompt, tool schemas and message history competing for the same token budget, which is the point of the course.
Two things did not follow the prompt. Every lesson ended with a quiz, although I asked for one on lesson 3 only. And lesson 2's example hard-coded model: "gpt-4o", which nobody asked for. Neither is wrong, but a playlist follows its own plan more than a single explainer does, so keep per-lesson instructions short.
Go deeper and follow-ups cost one explainer each
Two buttons keep the conversation going after an explainer ends. Go deeper sits in the player's top corner (or the right-click menu). It pauses playback and opens a card for the current slide, then spawns a standalone explainer that uses the lesson and that slide as context (docs.scrimba.com/explain/going-deeper (opens in a new tab)). Follow-ups are the suggested questions on the end card, plus a free-text box.
Both create a new explainer, and both count against your allowance (docs.scrimba.com/explain/limits-and-plans (opens in a new tab)). A free account gets 10 explainers for the life of the account; Pro gets 100 a month. So a single question, two follow-ups and one Go deeper is four of a free account's ten. Redo slide and Regenerate narration, both in the player's cog menu, are free.
The seven styles, as the menu describes them
The chevron next to the Explain button lists seven styles with a tagline each. Quoting the menu:
- Explain: "Simple words, small steps" (the default)
- Standard: "Clear, well-rounded teaching"
- Per: "Plain language, concrete examples"
- Tom: "Tom Chant, in his own voice"
- LOL: "Funny and sarcastic, still accurate"
- Professor: "Maximum depth, down to the bytes"
- TLDR: "A few slides, straight to the point"
Per and Tom are Scrimba's founder and one of its teachers. Among the styles, TLDR is the only one that never ends with a quiz (overviews, own-code tasks and Chrome extension page explainers skip it too). Styles apply on the web only; explainers made from ChatGPT or an MCP agent are written by that model, so the picker does not exist there.
Portrait output and the mobile toggle
The cog menu on your own explainer has a Vertical view toggle, next to Show captions and Show watermark. I saw it in the menu and did not test what it does to the slides, so treat it as a portrait option to try rather than a feature I can vouch for. Scrimba's mobile app is not released; there is a waitlist, and the docs say your web explainers will appear in it at launch (docs.scrimba.com/explain/mobile-app (opens in a new tab)). Until then a phone gets the web player.
Prompts that waste your quota
With 10 explainers on a free account, the expensive mistakes are the ones that make you regenerate.
- A prompt with no audience sentence. Scrimba's docs say this is the line most people skip; I did not test the omission myself, but a second explainer to fix the pitch is the likely cost.
- Running the same prompt across styles to compare them. I have done that for you above; the differences are small.
- Asking for "everything about X". My seven explainers ran between 0:51 and 1:28, so a broad topic gets a shallow pass. Narrow it or use a playlist.
- Chaining follow-ups instead of writing the follow-up question into the original prompt.
- Regenerating to fix one slide or a mispronounced word. Redo slide and Regenerate narration are free.
If you are working through Scrimba's AI courses, the AI Engineer path and the AI Engineering and AI Agents courses are the places where these prompts pay off: use an explainer on the one lesson you failed to follow, with the course's own variable names in the audience sentence.
Ten free explainers is enough to learn the prompt shape
A free Scrimba account gets 10 explainers for life. Write the audience sentence first, and one of them is usually enough.
References
- Scrimba Docs, Writing a good prompt (opens in a new tab): topic, audience and slide types, art styles, pushing depth past the style.
- Scrimba Docs, Teaching styles (opens in a new tab): the seven styles and that they are web-only.
- Scrimba Docs, Attaching documents (opens in a new tab): accepted file types and the paste-to-attachment behaviour.
- Scrimba Docs, Playlists (opens in a new tab): one URL per lesson, inherited style and visibility.
- Scrimba Docs, Going deeper (opens in a new tab): what the button does and that it consumes allowance.
- Scrimba Docs, Limits and plans (opens in a new tab): 10 explainers on Free, 100 a month on Pro, what counts.
- Scrimba Docs, Mobile app (opens in a new tab): waitlist only at the time of writing.
- The seven explainers generated for this post, all Public: A1, A2, A3, B, the playlist (1, 2, 3).
Three things: the topic, the audience (who it is for and what they already know), and the slides you want, such as one diagram, one code slide and a quiz. Scrimba's docs call the audience line the sentence most people leave out. I did not test a prompt without one. On the same RAG prompt, though, switching teaching styles changed less than I expected, so the prompt text is where the depth gets set.
Source: Scrimba Help Centre
Start with Standard. It produced the most accurate code of the three I compared on the same RAG prompt, and it was the same length as Professor. Use Explain when you want an analogy and shorter sentences, and TLDR when you want the core idea in a few slides without a quiz.
Not noticeably, at least for a detailed prompt. On the same RAG prompt, Professor ran 1:26 against Standard's 1:28 with the same slide types and overlapping headings. It added one worked example of embedding vectors and nothing else Standard lacked. If you want depth, ask for it in the prompt.
Yes. The composer accepts code files, text and Markdown, PDFs, images and Jupyter notebooks, by drag and drop or the paperclip button. Pasting a large block of text also turns it into an attachment. The docs state no size limit and say nothing about how uploads are stored, so do not attach anything confidential.
Source: Scrimba Help Centre
Yes. Each follow-up question and each Go deeper click creates a new explainer and counts against your allowance: 10 for life on a free account, 100 a month on Pro. Redo slide and Regenerate narration are free.
Source: Scrimba Help Centre
Toggle the playlist icon in the composer and describe the lessons you want. Explain plans the series and builds each lesson as its own explainer with its own URL. My three-lesson context engineering playlist finished in under 40 seconds, but every lesson got a quiz even though I asked for one on the last lesson only.
Source: Scrimba Help Centre
The cog menu on your own explainer has a Vertical view toggle. Scrimba's mobile app is waitlist-only at the time of writing, and the docs say your web explainers will appear in it once it launches.
Source: Scrimba Help Centre