Deploying with Netlify
Treasure Porth's free Deploying with Netlify runs 23 minutes across ten scrims and shows two ways to put a site online: drag a folder onto Netlify Drop, or connect a GitHub repo so pushes to main redeploy automatically. There's no coding and nothing to build, just a live URL by the end of scrim two.
Reviewed inside the course with a Pro account, September 2026.
Quick answer
Deploying with Netlify fits anyone who has finished a project and never put it online: drag-and-drop through Netlify Drop for plain sites and built projects, or continuous deployment from a GitHub repo with deploy previews on pull requests. The catch is skill level, not content: if you already push to GitHub and know what npm run build does, there is nothing new here. Pair it with Build and Deploy Your Portfolio if you need something to deploy first.
Deploying with Netlify
FreeTaught by Treasure Porth (opens in a new tab)
Two ways to deploy to Netlify, drag-and-drop and Git-based, for plain sites and for React, Vue, and Next.js projects with a build step.
Start free on Scrimba (opens in a new tab)Is it worth your time?
Yes, if you fit the target reader: you have built something and it only exists on your laptop or inside a scrim. Deployment is the step beginners put off because it sounds like infrastructure, and this course makes it feel like uploading a file. The first live URL arrives at about the one-minute mark of the second scrim, which is the whole pitch of the course.
Two things to know before you start. First, this is a screen recording of Treasure clicking through Netlify, GitHub Desktop, and VS Code, narrated over slides. The scrim editor sits underneath, but you do not type in it, and there are no challenges. Second, the course is "organized as a choose your own adventure," as Treasure says at 0:47 of the intro. She expects you to jump to the one scrim that matches your project rather than watch all ten. Read the section below, find your case, and go there.
What you'll learn
The course is a flat list of ten scrims with no module headers on Scrimba. The grouping below is mine, following the two sections Treasure announces in the intro, and the scrim counts and durations come from the expanded table of contents.
Course curriculum
10 scrims, about 26 minutes of video including two Scrimba house scrims at the end.
- Intro and Netlify sign-up
- Drag-and-drop deploys (Netlify Drop)
- Continuous deployment and deploy previews
- Scrimba wrap-up (referral program, certificate)
Scrimba's listing says 23 minutes and its structured data says 10 lessons; the eight Netlify scrims add up to 23:03, and the two closing scrims by Per Borgen (a referral-program pitch and a certificate tip) bring the total to just under 26 minutes.
Inside the course, module by module
1. Intro and Netlify sign-up (3 min, 1 scrim)
The intro does three jobs in under three minutes. It names the two methods, drag-and-drop and continuous deployment, and says who each is for: "I recommend drag and drop deployment if you're not super familiar or comfortable with Git and GitHub yet," Treasure says at 1:06, and continuous deployment "if you're comfortable pushing a project to Git." It explains the one distinction the rest of the course hangs on: projects with a build step (anything scaffolded with Vite, Create React App, Vue CLI, or Next.js) have to be "minified, bundled, transpiled, basically prepared for production" before Netlify can serve them. And it walks you through creating a Netlify account, which you can do with an email address or your GitHub login.
If you do not know what a build step is, this is the scrim that explains it. If you do, skip straight to your case.
2. Drag-and-drop deploys with Netlify Drop (9 min, 3 scrims)
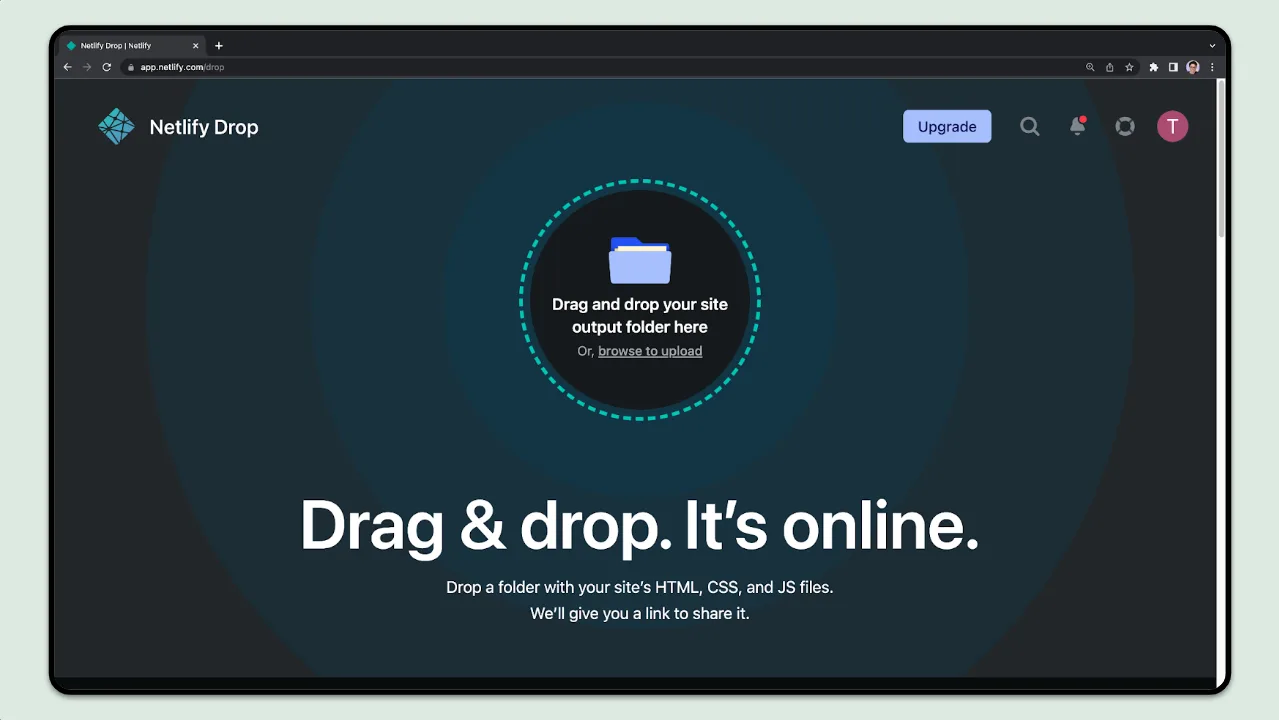
Scrim 2, "Drop Deploy a Plain JavaScript Project," is the shortest useful lesson in the course at 1:41. The demo project is a small row counter app on a yarn background, loaded in the scrim so you can download it yourself (gear icon, "Download as ZIP"). Treasure then opens Netlify's drop page: "You're going to drag and drop the folder you want to deploy into this circle, and the rest just happens." Netlify generates a random URL, you refresh, and the site is live. She frames this as the method for prototypes and small finished projects you will not touch again, and says at 0:20 that anyone comfortable with GitHub should skip ahead to continuous deployment instead.
Scrim 3, "Drop Deploy a React/Vue/Next.js Project," is the longest in the course at 4:20 and the first one that assumes tools on your machine. Treasure states the prerequisites at 0:45: VS Code or another editor, basic command line, and Node with npm installed. She scaffolds a React app with Vite from the terminal, runs it locally, makes a visible change to the heading, then runs npm run build and drags the generated dist folder onto Netlify. The part worth remembering comes at 3:41: updates go through the site's Deploys page, not the public drop page, because "if you go to the slash drop site, that will create a whole new deploy."
Scrim 4, "Drop Deploy a React app from a Scrim," covers the case most Scrimba learners have: a React project built inside a scrim. The downloaded ZIP needs a webpack.config.js (the scrim's dependencies panel lists React 16.13.1, which dates the setup). If the HTML head loads Babel standalone instead, you can skip the build and drag the folder as-is. Otherwise it is npm install, then npm run build, which produces an index.pack.js, then drag the whole folder. Treasure is candid about the sample: "this is a not very pretty and unfinished React project, but it's just an example."
3. Continuous deployment and deploy previews (11 min, 4 scrims)
This is the section Treasure calls "one of my favorite Netlify features." Scrim 5, "Intro to Continuous Deployment," defines it in one sentence at 0:04: "every time you update your main branch on GitHub with changes, Netlify will automatically redeploy your application." The scrim itself is a GitHub Desktop walkthrough: add the row counter folder as a repository, let GitHub Desktop create one when it says the folder is not a repo yet, initialize with a README, and publish. There is no Git command line anywhere in the course; if you use the terminal for Git, translate as you go.
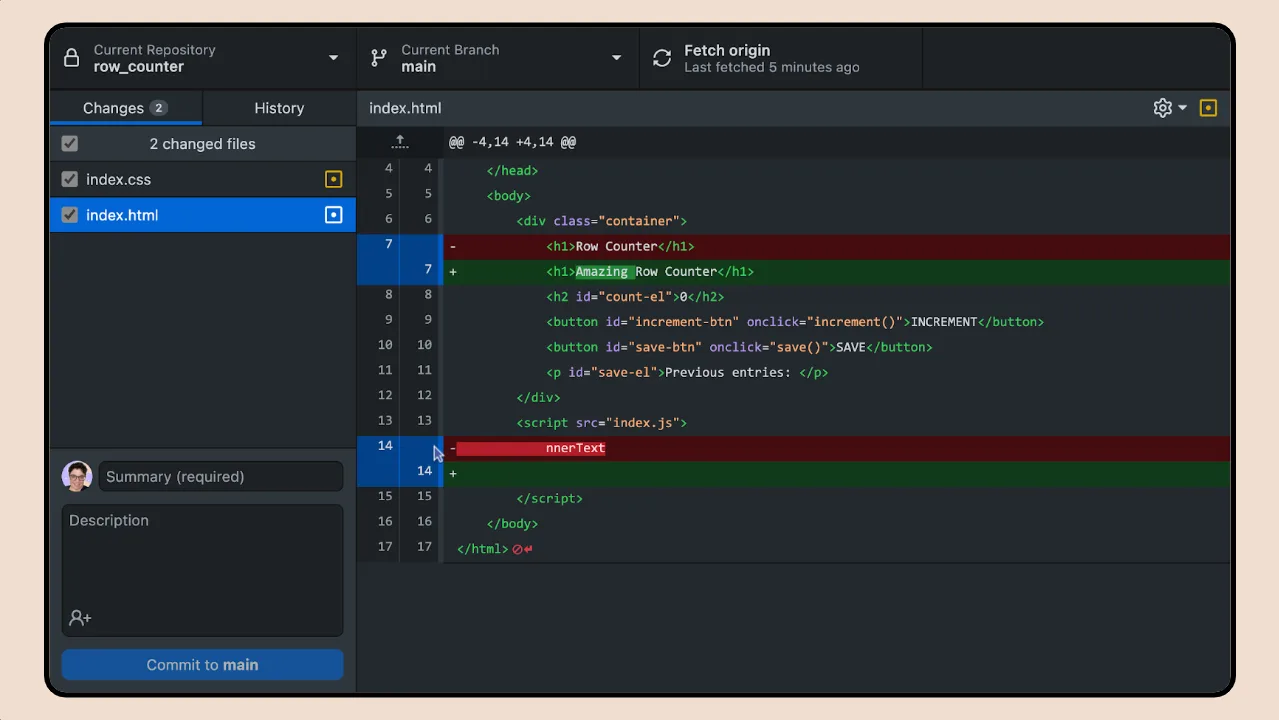
Scrim 6, "Continuous Deployment for a Plain JavaScript Project," does the Netlify half. In the Netlify dashboard you click "Add new site," "Import an existing project," pick GitHub, choose the repo, leave every setting alone, and deploy. The proof comes when Treasure notices the counter stretches too wide outside the scrim's mini browser, changes a max-width from 80% to 400px in VS Code, adds a word to the title, commits and pushes from GitHub Desktop, and reloads: "those changes have been automatically deployed just like that."
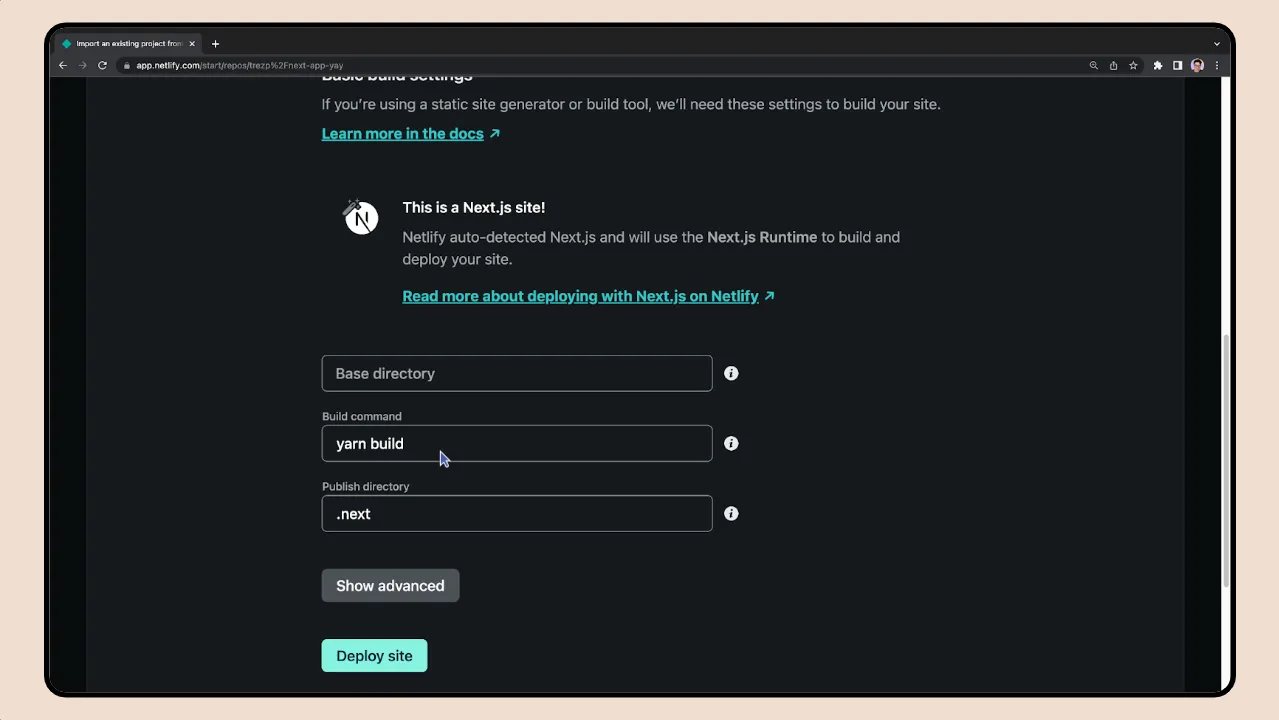
Scrim 7, "Continuous Deployment for a React/Vue/Next.js Project," repeats the flow with a Next.js app created from the terminal. Treasure again lists what she assumes: pushing to GitHub, an editor, Node and npm, and a terminal. The point of the scrim is at 0:23: "Netlify will do its best to guess what kind of project you have and do all of the work of deployment without you having to configure much of anything at all." When she imports the repo, Netlify's settings page says "This is a Next.js site!" and pre-fills the build command and publish directory, so she scrolls past and clicks deploy.
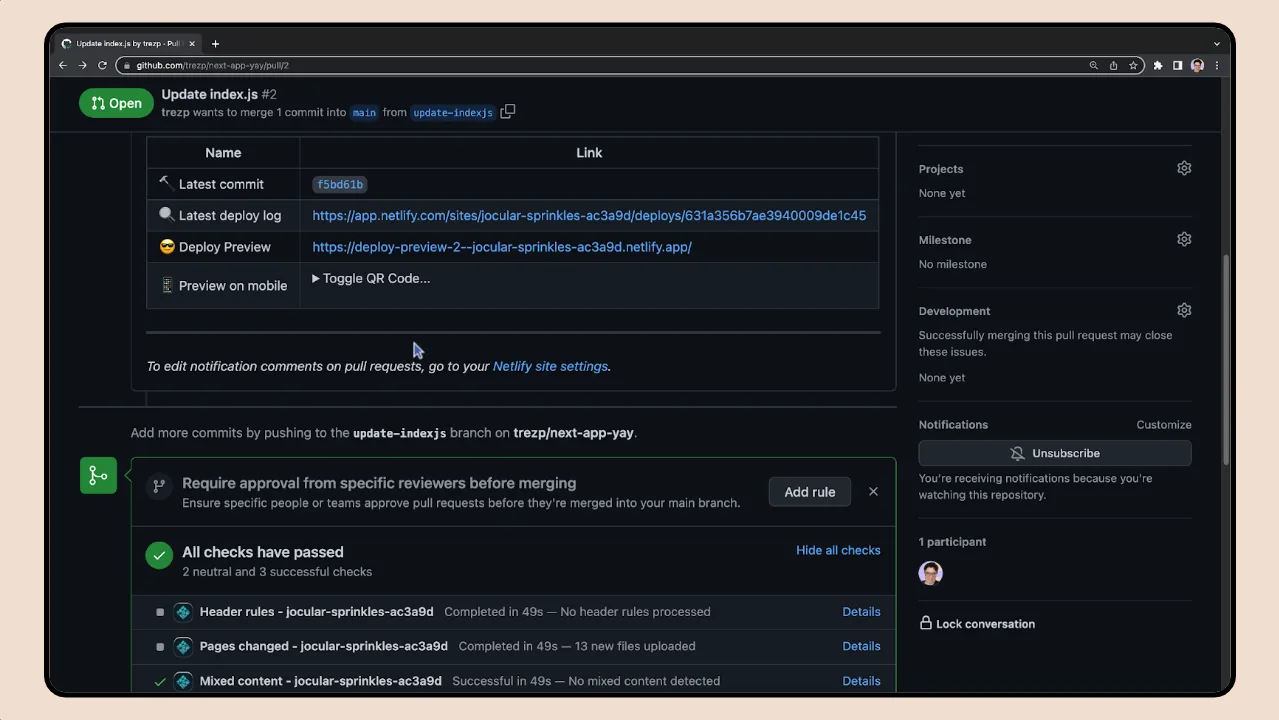
Scrim 8, "Netlify's Deploy Preview," is the one part of the course that goes beyond getting a site live. It assumes you know branches and pull requests. Treasure creates a branch, strips the Next.js starter page down to a heading, and opens a pull request. Netlify's bot comments on the PR with a deploy preview link and a QR code you can point a phone camera at. The preview itself carries a toolbar for screenshots, screen recording, and filing issues, which she pitches as useful "when you're working on a project as part of a team." Merging the PR triggers the production deploy. She also admits at 1:10 that she is not very familiar with Next.js either, and that the preview works with any project type.
4. Scrimba wrap-up (3 min, 2 scrims)
The last two scrims are not about Netlify and are voiced by Per Borgen, not Treasure. One pitches Scrimba's referral program, the other is a one-minute tip on adding your certificate to LinkedIn and your resume. They appear at the end of many Scrimba courses. Skip them unless either topic interests you.
What a lesson feels like
Every Netlify scrim is a narrated slide deck with screen recordings of Netlify, GitHub Desktop, VS Code, and a terminal embedded in the slides. Scrimba's editor and file explorer sit beneath the slide, and the row counter project and the React sample are loaded there so you can download them, but there is nothing to type and no "your turn" pause. The scrubber, captions, and full transcript panel all work as in any scrim, with subtitles in ten languages, and I found the transcript panel the fastest way to find a specific step again.
Treasure's narration is direct and unhurried. She states prerequisites at the top of each scrim that needs them, and she repeats them rather than assuming you watched the previous one, which fits the skip-around structure. The slides are clickable: the Netlify logo goes to the drop page, the Vite and Next.js commands go to their documentation, and there are links to VS Code and a Node install guide for people who lack them. Expect to leave the scrim and do the steps in your own browser and terminal; the course is a guide to a workflow that happens outside Scrimba.
Free or Pro: exactly what is gated
All ten scrims are free and the first one is marked SAMPLE, so you can start without an account. There are no Solo Projects and no challenges in this course, so there is nothing inside it for Pro to gate. The one Pro item is the certificate of completion at the end, which Scrimba only issues to Pro members. Pro also unlocks the career paths and the Pro-only channels on Scrimba's Discord; the pricing page lists basic Discord access as free, so the server itself is not a Pro perk. For a 23-minute course, none of that changes the decision. See current plans (opens in a new tab) if you are weighing Pro for other reasons.
How long it takes
Watching everything takes 26 minutes. Doing it takes longer, because the work happens in Netlify, GitHub, and your terminal rather than in the scrim. For a plain HTML/CSS/JS site with drag-and-drop, budget 30 to 45 minutes including signing up for Netlify. For continuous deployment of a project with a build step, budget one to two hours if you already have Node, an editor, and GitHub Desktop installed, and a good part of an afternoon if you have to install them first. Treat the deploy preview scrim as optional until you work on a team.
Who it's for, and who should skip it
It fits anyone who has finished a project on Scrimba or on their own machine and has never put it online. It is a natural follow-on to Learn HTML and CSS, Learn JavaScript, and the portfolio and space travel projects, and it is the fastest way to get a real URL for a portfolio or a job application. It also suits Scrimba React learners who want to deploy a scrim project, since scrim 4 handles that exact case.
Skip it if you already deploy from GitHub with any host. There is nothing here you do not know. Skip it too if you need a backend: the course is about static sites and frontend frameworks, and it does not cover serverless functions, environment variables, custom domains, build failures, or Vercel and GitHub Pages as alternatives. Scrimba rates it Intermediate, which is a warning that scrims 3, 4, and 7 assume a terminal and Node rather than a comment on difficulty; the drag-and-drop scrims are beginner-level.
Start Deploying with Netlify for free (opens in a new tab)Prerequisites
For drag-and-drop with a plain site: a project folder and a free Netlify account. For projects with a build step: VS Code or another editor, Node and npm, and comfort running two or three commands in a terminal. For continuous deployment: a GitHub account and GitHub Desktop, since that is what the course uses. For the deploy preview scrim: branches and pull requests. If Git is new to you, Learn Git and GitHub covers what this course assumes.
Where it fits
Scrimba's course page does not attach this course to a career path. It works as a finishing step after any project course, and Scrimba's beginner courses already lean on it: the passenger counter in Learn JavaScript deploys to Netlify at the end of its first module. Take it the day you finish a project you want to show someone, then come back for the continuous deployment half once you are using GitHub.
Strengths and limits
What it does well: it is free, it gets a first site online in the second scrim, it covers the scrim-download case that other deployment tutorials ignore, it is structured so you only watch the scrim you need, and the auto-detection demo for Next.js is a reassuring answer to "what do I configure."
Where it is limited: there is nothing to practice inside Scrimba, the Git workflow is GitHub Desktop only, the React sample uses React 16 and webpack and looks dated next to current Scrimba React courses, and the course stops at deploy previews without covering domains, environment variables, serverless functions, or what to do when a build fails. Scrimba's structured data dates the course to September 2022, so expect some Netlify buttons to have moved since the slides were recorded; I did not re-check every screen against the current dashboard.
Related courses and comparisons
- All JavaScript courses, the full category
- Build and Deploy Your Portfolio, a project that ends with a deploy
- Build a Multi-Page Website with HTML and CSS, a site worth deploying
- Learn Git and GitHub, the Git the continuous deployment half assumes
- Intro to Vite and Learn Next.js, the scaffolding tools that appear in scrims 3 and 7
- Scrimba for beginners, if you are just starting out
Yes. All ten scrims are free and the first is a SAMPLE lesson you can watch without an account. There are no Pro-gated lessons or projects inside it; only the certificate at the end requires Pro.
About 26 minutes of video (23 minutes of Netlify content plus two short Scrimba house scrims). Doing the deploy alongside it takes 30 to 45 minutes for a drag-and-drop site and one to two hours for continuous deployment of a project with a build step.
Treasure Porth teaches the eight Netlify scrims. The two closing scrims, about Scrimba's referral program and the certificate, are voiced by Per Borgen.
Drag-and-drop through Netlify Drop, for plain sites and for the built output of Vite, Create React App, or Next.js projects, and continuous deployment from a GitHub repository, including deploy previews on pull requests.
Not for the plain drag-and-drop scrim. For anything with a build step you need Node and npm, an editor such as VS Code, and a terminal; for continuous deployment you also need GitHub Desktop, which is what the course uses. The slides link to VS Code and a Node install guide.
No. Every scrim is a narrated screen recording. The sample projects are loaded in the scrim editor so you can download them, but there is nothing to type and no AI-checked challenges.
Only for the continuous deployment half, and only at the level of GitHub Desktop: create a repository, commit, push, and for the last scrim, branch and open a pull request. The drag-and-drop scrims need no Git.
No. It ends at deploy previews. Custom domains, environment variables, serverless functions, build failures, and other hosts are all out of scope.
Yes, scrim 4 covers exactly that: download the ZIP, check for webpack.config.js, run npm install and npm run build, then drag the whole folder onto Netlify. If the project loads Babel standalone in the HTML head, you can skip the build.