Learn Next.js
Scrimba's free Learn Next.js course runs about 8.5 hours: Bob Ziroll teaches the first two sections, Rachel Johnson the third. You build PrintForge, a 3D-model catalog, first with static pages and the App Router, then a SQLite database with search, sort, and pagination. It assumes React already, and six early scrims no longer run inside Scrimba.
Reviewed inside the course with a Pro account, September 2026.
Quick answer
Take it once you know React. PrintForge is a site where 3D printing enthusiasts browse models, and the second half drives search, sort and pagination from the URL. Plan to do six early challenges in a local editor, since those no longer run inside Scrimba.
Learn Next.js
FreeTaught by Bob Ziroll (opens in a new tab)
App Router routing, layouts, rendering strategies, and a SQLite data layer, built into one PrintForge project on Next 15.
Start free on Scrimba (opens in a new tab)Is it worth your time?
Yes, with two caveats. The format fits Next.js unusually well because a real next dev server runs inside the scrim: the Runner pane at the bottom prints GET /3d-models?page=12 200 in 52ms as you click through the preview, so you see server rendering happen instead of being told about it. The course is also built around one codebase. Bob says in the intro that he "decided to really hone in on one project and build it completely from scratch from beginning all the way to the end," and by the last scrim PrintForge has a lib/ data layer, thirteen components, and a printforge.db file. That is closer to a real app than most free courses get.
The first caveat is the "Bug Alert!" scrim, 48 seconds long, that appears second in the table of contents. Tom Chant explains that "a change to a service provided to Scrimba by a third party means that currently what Bob shows does not work in Scrims," and puts a red box around six scrims, from "A Minimal Next.js Setup" through "Running create-next-app." His advice is to watch them and "take the code offline and do the challenges in your local IDE." Once the course switches to Scrimba's Runner, at scrim nine, everything runs again. It is a real gap, and the course has not been re-recorded around it.
The second is continuity. Bob teaches sections 1 and 2, then Rachel Johnson opens section 3 with "if we haven't met yet, I'm Rachel, and I'll be your instructor for the rest of the course." She rebuilds PrintForge from a finished HTML mockup with slightly different folder names, so the project you finish is not the one you started. Her section is the best material in the course, but if you expected 8.5 hours of Bob, adjust.
What you'll learn
Course curriculum
3 modules · 123 lessons
- Build a Next.js App
- Rendering Strategies and More
- Making Data Flow
Lesson counts are the scrims I counted in each expanded section in September 2026, 123 in total plus a one minute "How to Utilize Your Certificate" scrim that sits outside the sections. Scrimba's own figures differ: the section headers show 16, 16, and 64 (they leave out intros, asides, recaps, and the bug alert), while the course listing and its structured data say 127 lessons. Where other pages on this site quote 127, that is Scrimba's number. Eighty of the 123 scrims carry the "Challenge with Instant Feedback" icon, meaning an AI checks your code when you submit.
Inside the course, section by section
1. Build a Next.js App (2 hrs, 27 scrims)
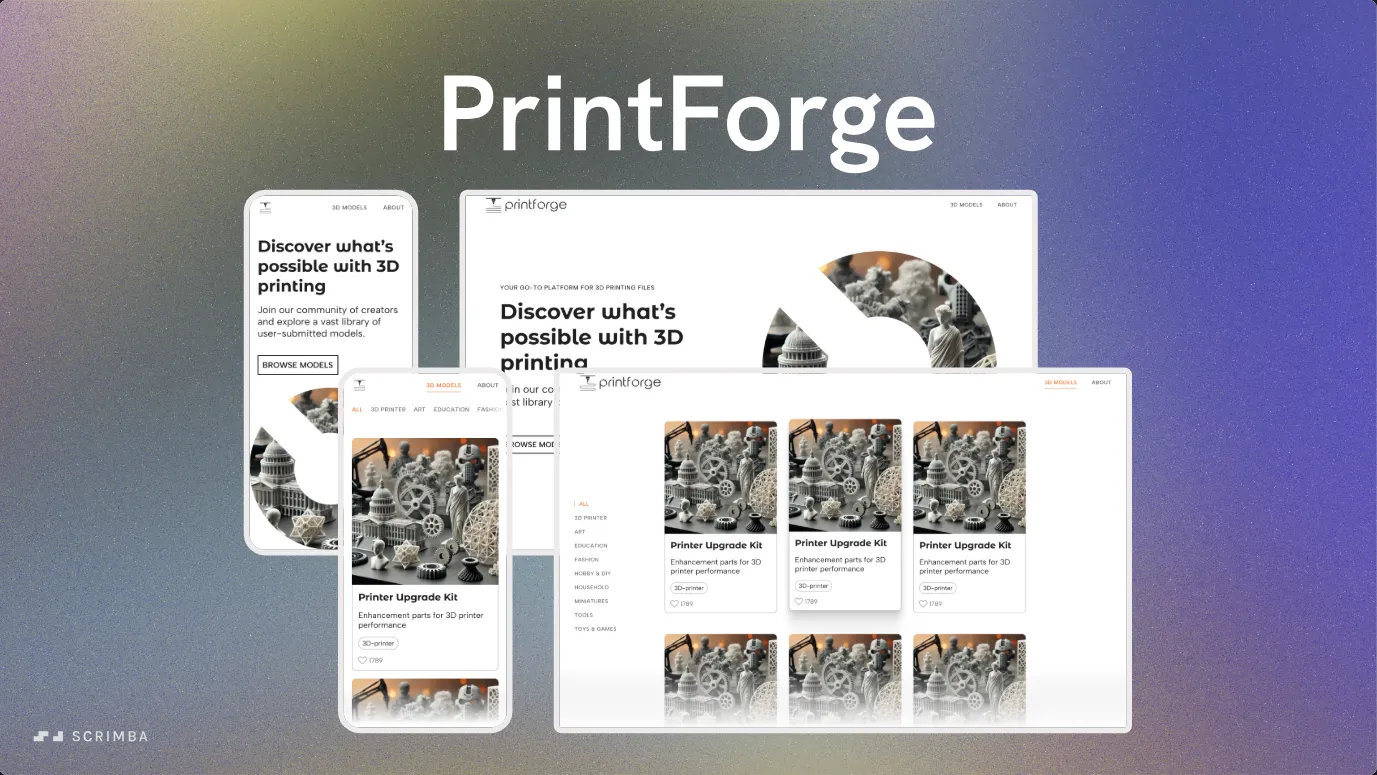
Bob's intro sets the prerequisites plainly, "a solid foundation in HTML, CSS, JavaScript, and React," and names two tools he uses without teaching: Tailwind CSS and TypeScript. Then comes the bug alert, then the six scrims that no longer run: a minimal Next.js setup, a challenge to create an app from scratch, adding a page, file-based routing, and two scrims on create-next-app. Scrimba's "Runner" is where the working part of the course begins: a pane that runs npm run dev for you, with the Next.js compile log underneath the editor.
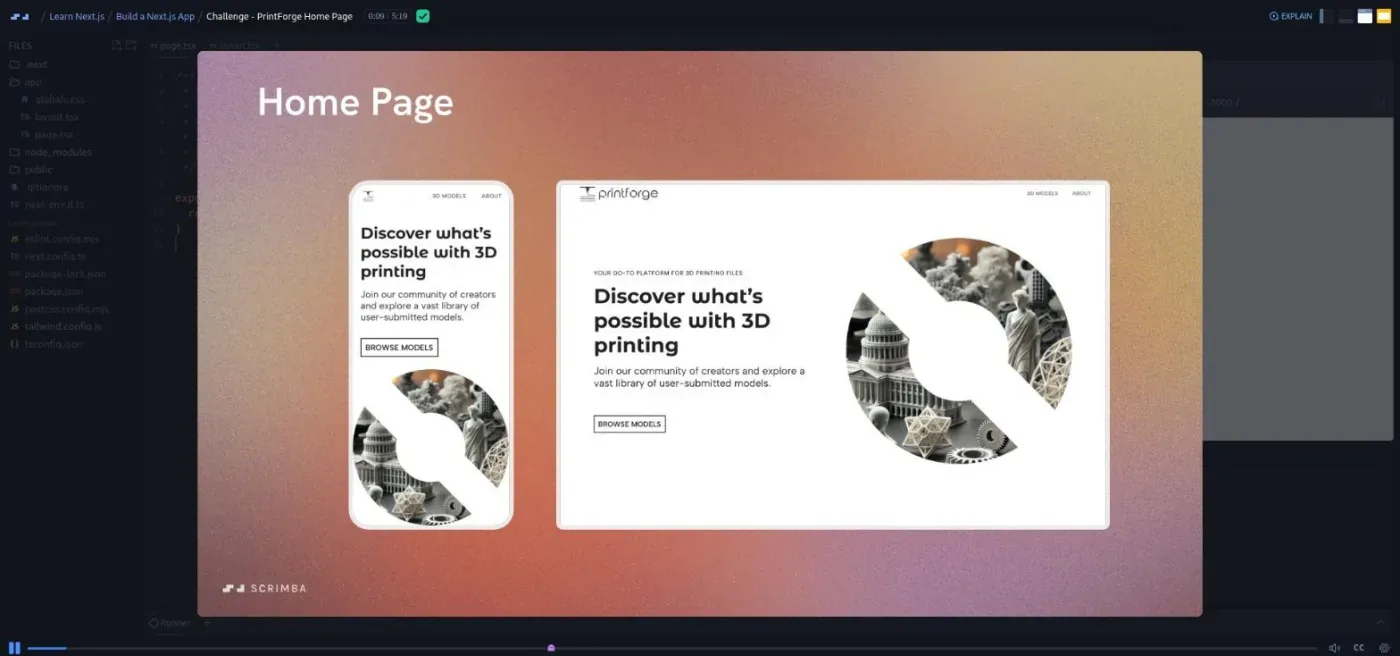
From there the PrintForge build is a run of challenges. The home page challenge opens with a slide of the Figma design, mobile and desktop, and a note in the file that says "I won't expect you to put much effort into the CSS of the challenges." Bob explains the choice: "I've decided to use Tailwind CSS to do a majority of the styling for this project. I do wanna caution that I don't want Tailwind to become a distraction for you." The package.json in that scrim pins next 15.2.4 with React 19, Tailwind 3.4, and TypeScript 5.
After the home and about pages come nested routes, two scrims on layouts, a header challenge, and two long lessons (nine minutes each) on optimizing fonts and images with next/font and next/image. Links get their own scrim and a navbar challenge. Two asides follow, one on how TypeScript types are organized in PrintForge and one on client versus server components, before the models list challenge, a nine minute "Dynamic Routes" lesson, and the model detail page. A recap closes the section. Fourteen of the 27 scrims are AI-checked challenges.
2. Rendering Strategies and More (2.4 hrs, 25 scrims)

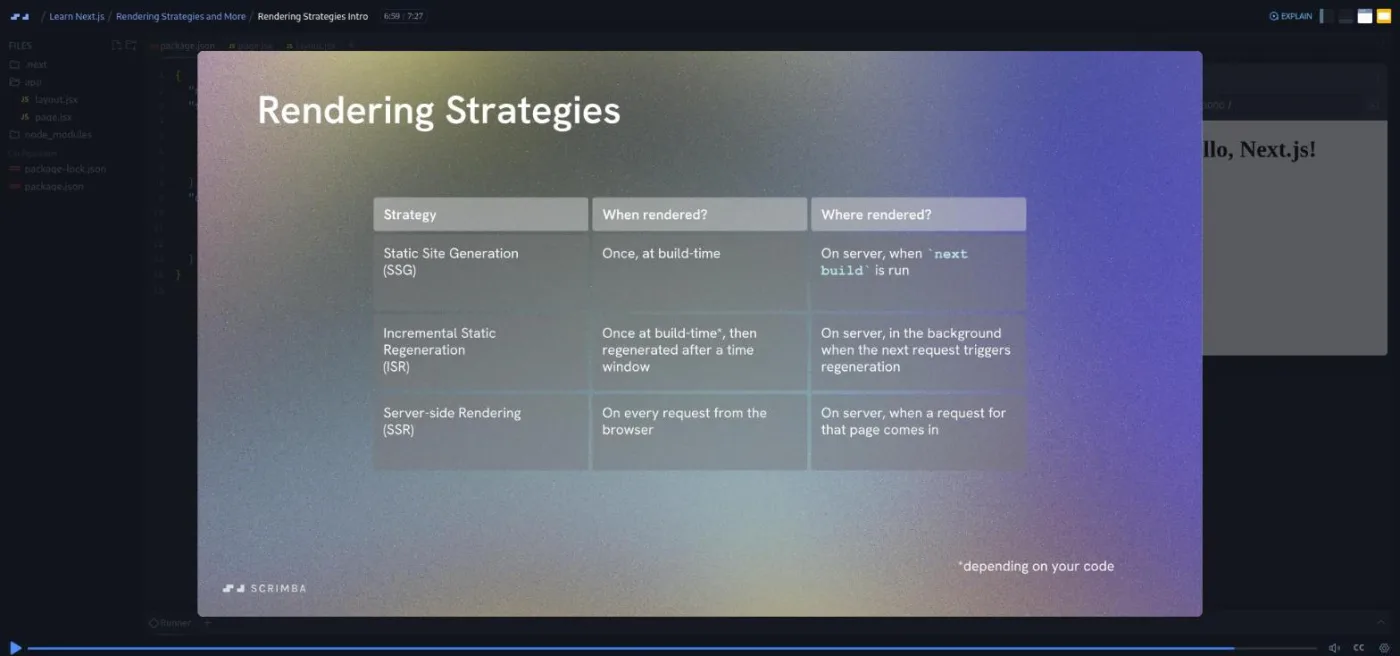
The first ten scrims are still PrintForge: a categories page challenge, a categories nav bar, an aside on usePathname, link refactors, two more lessons on client components, and challenges to style the active link and build category pages. Then the section changes gear. "Rendering Strategies Intro" is, in Bob's words, "a little bit slide heavy and is going to include some new terminology that you may not be familiar with." He frames the whole topic as giving your app "the ability to decide when and where a page's HTML is built," walks through build time, request time, and in-browser rendering, and then names the three strategies: SSG, ISR, and SSR.
The practical half uses a separate, smaller project, Cat Facts, written in plain .jsx rather than TypeScript. Bob turns the Runner off and uses the terminal instead, so you type npm run build and npm start yourself and read the build output, where a circle marks a static route and an "f" marks a dynamic one. Then you add export const dynamic = 'force-dynamic' and build again. He is candid about the dev overlay that claims to show static or dynamic: "I haven't actually found it to be the most reliable way to tell." The remaining scrims add a fetch, a "Structured Play" exercise, a lesson on why HTML form submissions are navigation events, two scrims on searchParams, a PrintForge search bar using a native form, and an upgrade to Next's Form component. A "Tiny Library Solo" scrim, a recap, and a two minute Scrimbassador (affiliate program) pitch close the section.
Scrimba's own description of this section on the course page talks about SQLite, seeding, search, sorting, and pagination. That text describes section 3, not this one. Twelve of the 25 scrims are AI-checked challenges.
3. Making Data Flow (3.9 hrs, 71 scrims)
Rachel Johnson's section is almost as long as the other two combined, and it is built from short scrims, most between two and four minutes. It opens with what she calls a "recap gauntlet": three challenge scrims that rebuild the PrintForge shell, the models section, and the dynamic routes from a static mockup. Her reason is a good one: "Instead of building everything step by step from scratch, you'll be working from a finished HTML and tailwind mock up. This happens quite a lot in real life where you're handed static code and your job is to bring it to life." This version of PrintForge is on Tailwind 4.
Then the data work starts. "Setting Up the PrintForge Database" installs sqlite 5.1.1 and sqlite3 5.1.7 (she pins the versions because "only version five of SQLite three works reliably in the Scrimba environment") and creates lib/db.ts with a getDBConnection() function. The lib folder, she explains, "is where our data layer will live," the middle layer between the UI in app/ and the printforge.db file. Two seeding scrims fill the models and categories tables, then a run of scrims reads from the database, renders category links from data, makes the model cards dynamic, filters with SQL WHERE, and builds dynamic category and single-model pages.
The rest of the section adds features one URL parameter at a time. Search reads searchParams on the server and matches on name or description. Sorting moves the controls into a client component and refactors getModels() to take an options object. Loading states get a loading.tsx per route and pending UI with useTransition. Pagination, the longest run, goes from LIMIT and OFFSET to styled buttons on the category pages as well. The last few scrims get defensive: out-of-bounds page params, invalid sort params, and a redirect bug to debug.
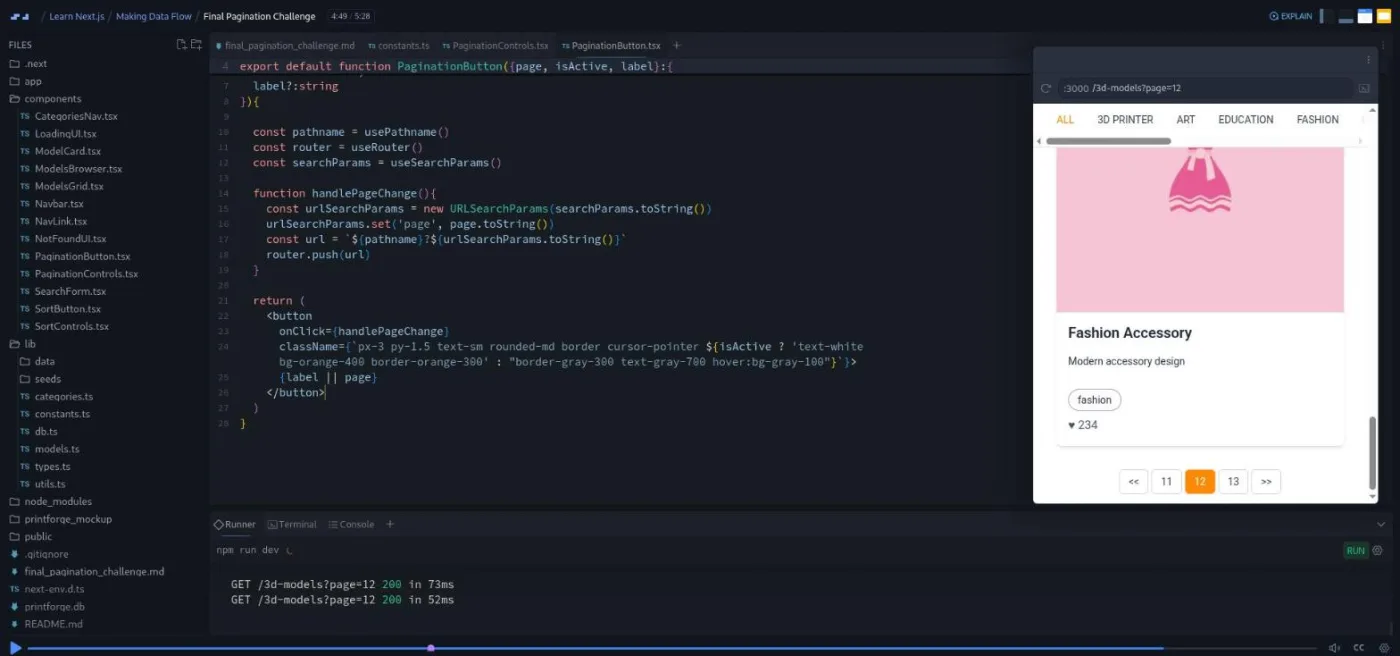
The final challenge is typical of her style. The brief is a markdown file in the project, she describes the target ("two arrows back takes us to the first page, two arrows forward takes us to the last page, and the middle buttons show the current page and its two closest neighbors"), and then: "It would be interesting to see how you go about it. Afterwards, I'll walk you through how I would do it." Fifty-four of the 71 scrims are AI-checked challenges. The outro recaps nine parts and ends with "in the next section, we will build on top of this foundation," so the course is still growing.
What a lesson feels like
Bob's scrims run two to ten minutes and mix slides with live editing; Rachel's are shorter and almost all code, usually one function or one component per scrim. In both, a challenge is a comment block or a markdown file in the project plus a pause in the recording. You write the code, save, watch the preview and the Runner log, then resume to see the walkthrough. Eighty scrims have AI feedback on your submission.
The preview pane is a real Next.js app served on port 3000 inside the scrim, which is the difference from a React course: you watch the Runner compile, see the request log, and in section 2 you run the production build yourself in a terminal. Every scrim has captions, a timestamped transcript under the settings menu, subtitles in ten languages, and playback speed. Both teachers point you outward when you get stuck. Bob suggests the Discord or "open up ChatGPT or your AI of choice and ask questions to it. It turns out it's very good at explaining these different concepts."
Free or Pro: exactly what is gated
The whole course is free: all three sections, every challenge, and the AI feedback on them. There are no "Solo Project (PRO)" items in this course's table of contents, which makes it unusual among Scrimba's flagship courses. Only the introduction carries the SAMPLE badge, but every other scrim opened for me without a wall, and the catalog lists the course under Free.
Pro gates the certificate (the one minute "How to Utilize Your Certificate" scrim sits outside the sections), the Fullstack Developer Path this course belongs to, and the Pro-only Discord help channels. Bob is precise about the last one in the intro: "although these specific help channels are dedicated for Scrimba Pro members, there are many other community channels in the Scrimba Discord server that you could ask questions in." Scrimba's pricing page lists basic Discord access as free, so the server alone is not a reason to upgrade. See current plans (opens in a new tab) if you want the path structure around the course.
How long it takes
8.5 hours is video runtime. With 80 AI-checked challenges, a build-and-inspect exercise in section 2, and a 71 scrim data section where nearly every lesson asks you to type, plan for 20 to 25 hours: three to four weeks at an hour a day. Add two or three hours if you do the six broken scrims properly in a local editor, which means installing Node and running create-next-app yourself. Section 3 alone is 3.9 hours of video and took the largest share of my time because each scrim ends with a save-and-check loop.
Who it's for, and who should skip it
It fits you if you have finished Learn React or the equivalent and want to ship multi-page apps rendered on the server with real data. It is also a good fit if you learn best by extending one codebase rather than starting a new toy project every module; PrintForge is the only project in sections 1 and 3.
Skip it, for now, if you have not written React. Next.js is a framework on top of React, and Bob says the prerequisites out loud in the first scrim. Skip it if you want the current server actions, authentication, or deployment story; none of that is here yet, and the data layer is SQLite in the browser sandbox, not a hosted database. And if the six non-running scrims would bother you, know that they cover the local setup story, which the Next.js roadmap on this site also outlines.
Start Learn Next.js for free (opens in a new tab)Prerequisites
Working React: components, props, hooks, and async/await. Enough TypeScript to read a typed function signature; Bob keeps the types in a dedicated file so they do not become the focus. Enough Tailwind to recognize utility classes, or a willingness to ignore them. For section 3, basic SQL helps but is taught as you go: WHERE, ORDER BY, LIMIT, OFFSET, and COUNT() each get their own scrim. Nothing to install unless you choose to do the six early challenges locally.
Where it fits
Learn Next.js is part of the Fullstack Developer Path, not the Frontend Developer Path. In the fullstack path it is the Next.js module, sitting after the React, Node, Express, SQL, and TypeScript blocks, and it is the bridge from frontend React into fullstack work. Do Learn React first. If section 3's SQL was the part you liked, Learn SQL goes deeper. If you would rather build the server yourself, Learn Express.js and Learn Node.js are the alternatives. For the type annotations you will see throughout, Learn TypeScript. If you are comparing this against courses outside Scrimba, the best Next.js courses of 2026 rounds up the other options worth a look.
Strengths and limits
What it does well: it is free with no Pro-gated projects, a real Next.js dev server runs inside the scrims from the Runner onward, the versions are recent (Next 15.2.4, React 19), section 3 builds a data layer with search, sort, pagination, loading states, and URL validation, and both teachers are clear about what they are skipping and why.
Where it is limited: six early scrims error inside Scrimba and have not been re-recorded, the teacher and the project structure change at section 3, the section 2 description on Scrimba's own page is wrong, and there is no coverage of server actions, auth, or deploying to a host. The outro promises another section, so treat the current scope as version one.
Related courses and comparisons
- Learn React, the prerequisite
- Advanced React, deeper React patterns
- Learn Node.js, backend fundamentals for fullstack work
- Learn Express.js, a lighter server alternative
- Learn SQL, for the queries section 3 introduces
- Next.js roadmap, the free study plan around this course
Yes. All three sections, all 123 scrims, and the AI feedback on the 80 challenge scrims are free. There are no Pro-only solo projects in this course. Pro is needed only for the certificate, the career paths, and the Pro-only Discord channels.
Bob Ziroll teaches sections 1 and 2 (about 4.4 hours). Rachel Johnson teaches section 3, Making Data Flow (3.9 hours), and introduces herself as the instructor for the rest of the course. Tom Chant appears in a 48 second Bug Alert scrim.
Yes. The intro lists HTML, CSS, JavaScript, and React as prerequisites, and the first challenge already assumes you can write a component. Finish Learn React or the equivalent before starting.
PrintForge, a site for browsing 3D printing models. Sections 1 and 3 build it: static pages, layouts, dynamic routes, image and font optimization, then a SQLite database, a data layer, search, sorting, pagination, loading states, and URL validation. Section 2 uses a small Cat Facts app to demonstrate rendering strategies.
Next 15.2.4 on React 19 with TypeScript 5, in every package.json I opened. Section 1 uses Tailwind 3.4; section 3 uses Tailwind 4. Section 3 adds sqlite 5.1.1 and sqlite3 5.1.7. The rendering strategies lessons use plain JSX.
No. A Bug Alert scrim in section 1 marks six scrims, from A Minimal Next.js Setup through Running create-next-app, whose code errors in the browser because a third-party service changed after recording. Scrimba's advice is to watch them and do those challenges locally. From the Scrimba Runner scrim onward everything runs.
Not as of September 2026. Section 3 is about reading data: SQLite, a lib data layer, and search, sort, and pagination driven by URL params. The outro says another section will build on this foundation.
About 8.5 hours of video, but plan for 20 to 25 hours with the challenges, or three to four weeks at an hour a day. Section 3 alone is 71 scrims.
Yes. Every scrim has captions, a timestamped transcript panel under the settings menu, and subtitles in ten languages.